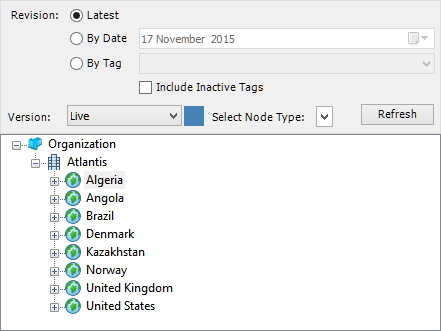
The Dataflow Batch Import screen
On the Dataflow Batch Import screen, you need to set up batches of imported files, and specify import settings.
Set up import batches
Each tab on the Dataflow Batch Import screen is an import batch. Batches are used to load files from several locations at once, or to load the same set of files with different settings. Batches are processed in their entirety before the import moves on to the next batch. Batch management buttons are described in the table below; the same functions are available in the context menu if you right-click on a batch tab.
Note: The order of tabs is important when importing the same projects with different settings; the import begins with projects selected on the leftmost tab and proceeds from left to right, so the correct order of tabs must be set up.
| Button | Description |
|---|---|

|
Creates a new batch. |

|
Renames the selected batch. |

|
Deletes the selected batch. |

|
Moves the selected batch to the left. |

|
Moves the selected batch to the right. |
Select documents to import
The left-hand side of the screen contains the Dataflow hierarchy and options for selecting documents from it.

In the Revision section, select which revision will be loaded. You can load the latest revision, or select a specific one based on tags or date and time.
In the Version field, select the hierarchy version from which you want to load documents. The Select Node Types list is a filter used to simplify the document selection process: open it to choose which node types you want to see in the hierarchy.
Specify import settings
Note: Settings in the right-hand pane apply to individual batches. Thus, you can select different import options for each set of imported files.
The settings determine how new and existing projects will be treated during import. All options are described in the table below.
| Option | Description |
|---|---|
| Create project | If a project does not already exist, it will be created. |
| Prompt to create project | If a project does not already exist, you will be asked if you want to create it. |
| Ignore project (do not add) | If a project does not already exist, it will not be imported. |
| Update project | Existing projects will be updated with values from the imported Dataflow document and, if required, moved to the consolidation node specified in the destination hierarchy. |
| Update project at any root | Existing projects will be updated and will remain in their current nodes in the destination hierarchy. |
| Create additional project | A copy of the existing project will be created and populated with values from the imported Dataflow document. |
| Log and skip project | Existing projects will not be updated, and a record will be made in the log file. |
| Only override the mapped variables | Check this box to update only those variables that are mapped in the template. Otherwise all variable values will be reset before import. |
| Only override periods containing import data | Check this box to update only those periods that exist in
imported data as the number of periods in Dataflow
documents can differ from |
The remaining settings define general import options (see the table below).
| Option | Description |
|---|---|
| Currency Scenario | Select a scenario from the list. |
| Keep values in source currency as defined in mappings | Check this box to keep the currency set up in the import template. Uncheck it to convert all currencies to the US Dollar. |
| Import from Tagged Scenario | To import from a document scenario with a particular tag, select this option and choose the tag from the list. This would only update documents that have a scenario tagged with the selected tag. |
| Import from Named Scenario | To import from a document scenario with a particular name, select this option and type the name. |
| Import into scenario | Select the destination project scenario in |
Save import settings
You can save the import settings to speed up the process if you import data several times with the same settings. To open a particular set of settings, select it from the list in the Batch import settings field. Next to this field is the menu with settings management options. You can also export and import settings to use them with different databases.
| Option | Description |
|---|---|
| New Settings | Creates a new set of settings. |
| Save Settings | Saves the settings. |
| Rename Settings | Renames the selected set of settings. |
| Delete Settings | Deletes the selected set of settings. |
| Import Settings | Imports the settings from a Workflow Template Document. |
| Export Settings | Exports the settings into a Workflow Template Document. |